It’s very important that you filter incoming air that’s being introduced into your grow tent or grow room. In this post we’ll discuss a few ways to make a grow tent intake filter, including a cheap and easy DIY air intake filter that only takes a few minutes to make.
The Phat 6 inch HEPA grow tent intake filter ($130) provides maximum filtration for tents, grow rooms, and greenhouses.
Grow tent intake filter options include:
A HEPA filter such as the 6″ Phat HEPA filter ($130) provides maximum filtration.
For a cheaper HEPA filter for grow tents, GrowBright makes 6″ ($85) and 8″ ($93) HEPA filters.
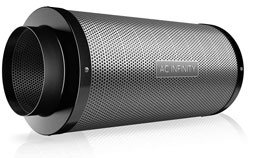
You can also reuse an old carbon filter and attach to your air intake vent. AC Infinity 4″ or 6″ carbon filters work well.
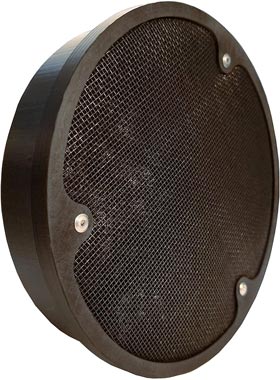
If you’re just looking to keep dust and adult insects out, the Atomic Innovations 4 inch ($16) or 6 inch ($20) air duct screen is a good option.
But if you want to save a few bucks we’ll show you a few cheap ways to make a DIY grow tent intake filter to keep dust and pests away from your weed plants.
Why is filtering your air intake important?
If you’re growing weed in a tent or grow room, you need to constantly exhaust air to replenish carbon dioxide and remove excess heat and humidity (unless you’re using a completely sealed room in which you provide air conditioning and supplemental CO2).
When stale air gets pulled out of your tent/room, incoming air needs to be introduced. This can be done passively through an open vent or tent window, or actively using a fan to force in fresh air.
To keep sticky buds free of unwanted dust, bugs, pet dander and a bunch of other gross stuff you don’t want to smoke it is necessary to filter this incoming air.
This is especially true if you’re pushing air through an air-cooled light fixture. If you let dust collect inside the glass below your bulb it will reduce the amount of light reaching your plants, lowering yield.
To prevent this from happening, below are a few different low-cost ways you to filter incoming air.
How to make a DIY grow tent intake filter
Most grow tents come with screened panels towards the bottom that can open up to allow fresh air into your tent. If you have a fan and carbon filter placed inside at the top of your tent and are sucking warm air out, you can simply open the lower vents to let fresh air in.
The easiest solution to filter air for these vents is to buy a large sheet of filter fabric, cut it to the size of the vent, then use Gorilla Tape around the edges to secure it into place. You can also use duct tape or aluminum tape, but those don’t typically stick to the sides of grow tents as well as the Gorilla Tape will so you’ll have to check frequently for peeling.
We’ve also tried using some of the fiberglass filter material on cardboard-wrapped air filters from Home Depot. Fiberglass filters are not recommended: they tend to cut your hands and they also may result in loose fiberglass fibers landing on your plants.
A light-proof air intake vent
If you’re in the vegetative stage you don’t need to worry about keeping your plants light-proof, so using your tent’s vents isn’t an issue. Simply tape a rectangle of fabric filter around the edges of your tent’s intake screens.
During flowering, you’ll need to make your tent light-proof to ensure 12 hours per day of uninterrupted darkness. So using the tent’s vent screen isn’t an option unless the tent itself is located in a completely dark room that won’t be disturbed.
When you flip to flower in a tent, close the vent (they usually attach with velcro) and then use black Gorilla tape to tape around the open sides to ensure no light leaks where the velcro attaches. It’s also good to check for other small light leaks around seams and tape those as well with black tape, just to be safe. Gorilla tape sticks well to fabric tent walls, but it won’t last indefinitely so check it often and push the tape down hard if it starts slipping.
Most tents have a few openings on the lower sides for ducting, so if yours has two towards the bottom that will work perfectly. Just stick the duct into the opening about 6 inches or so and pull the ropes around it tightly to block light.
Using an old carbon filter provides light-proof air intake for grow tents. This AC Infinity 6″ carbon filter ($68) is a reliable choice.
If your tent doesn’t have suitable openings for intake ducting, you can buy a flange kit for grow tent walls and install an opening fairly easily.
Since aluminum reflects light, loop the ducting in a small spiral outside the tent to avoid having a straight path for the light to carry through it. Pointing the outside end down towards a dark area (such as behind the tent) is helpful too.
You never want to let light enter so carefully check that when your grow light is running that you can’t see any light escaping the end of the flexible tubing – if light can get out, then light can get in. Using an old carbon filter as a grow tent intake filter has the added advantage of being light-proof.
If your vent openings are only at the top of your tent, just run the intake ducting inside the tent so it hangs down about a foot from the bottom. That way the cooler incoming air will enter down low. As the hotter air rises to the top the exhaust fan can pull it out. This provides a nice circulation that wouldn’t occur as evenly if the incoming air entered at the top near the exhaust fan.
How to make a filter to cover flexible aluminum ducting
Method 1: Flat air intake filter
There are a few ways you can make a do-it-yourself duct filter. The simplest way is to:
Cut a small circle of the fabric filter that’s about 3/4″ larger on each side than the width of the ducting you’re using.
Use duct tape to secure that filter to the sides of the aluminum ducting.
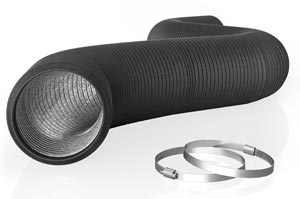
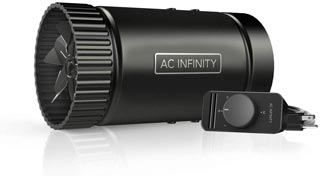
A small fan such as the 4″ AC Infinity duct booster fan ($28) is perfect for small grow tent air intake. Attach your filter to flexible ducting using Gorilla tape.
This method is very easy to do, but the filter surface area is only going to be the width of the ducting tube’s opening. It will get dirty pretty quickly, and you probably should inspect it frequently and plan to change this at least once every 2 months, or more frequently if it looks dirty. Dirty filters don’t allow as much air to pass through. Never change the filter with the fan running, it will suck in all the dust it had previously filtered out.
This approach can be used if you’re using passive intake ventilation (without an intake fan) or if you’re using a small duct fan to push in fresh air through the flexible ducting. If you’re using a fan you’ll find that the filter may get dirty quicker, reducing air flow and often increasing fan noise.
It’s better to use plain duct tape instead of the more adhesive Gorilla Tape to attach the filter to the flexible ducting, since you’ll need to eventually peel the tape and replace the filter when it’s dirty. Gorilla Tape is a bit harder to pull off and you may damage the thin aluminum ducting if you’re not careful.
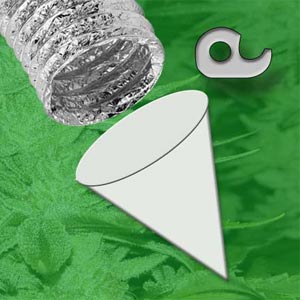
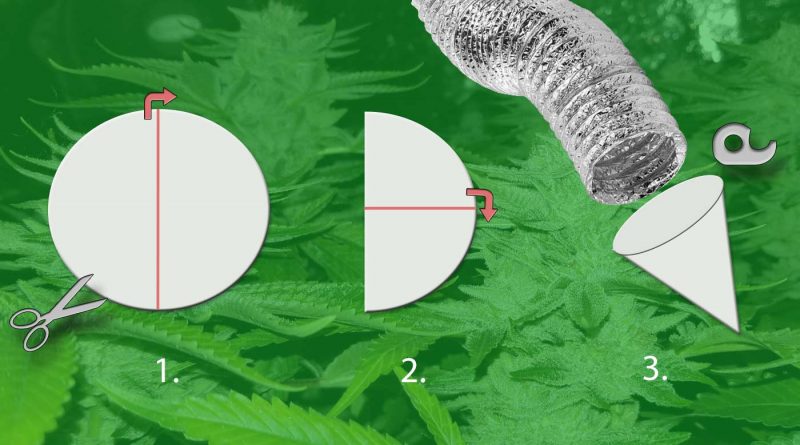
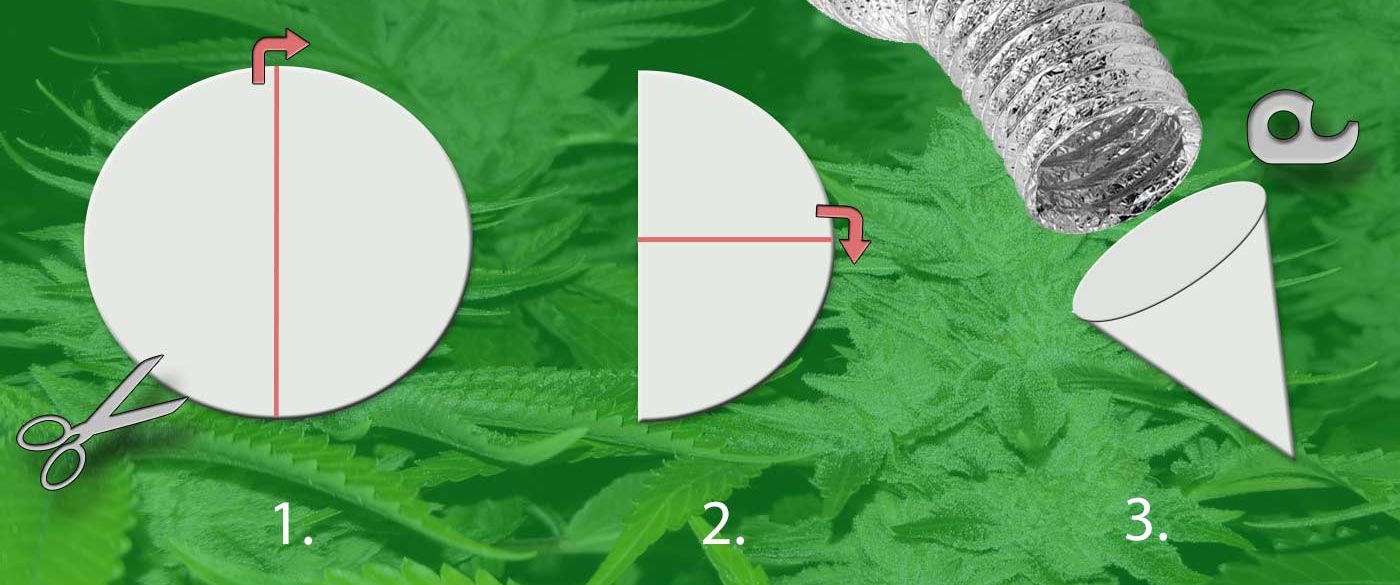
This DIY cone-shaped air intake filter uses .5 micron filter fabric ($35). 1. Cut a circle and fold in half 2. Fold into quarters. 3. Tape cone edge to ducting.
Method 2: Cone-shaped air intake filter
If you’re able to increase the surface area where the air passes through your filter you’ll increase the effectiveness and lifespan of your filter. So a step up ismake a larger cone-shaped filter that points out from the duct end.
Cut a circle of fabric filter that is about 2x the size of the ducting you’re using.
Fold the circle in half, and then fold that in half so it looks like a slice of pizza.
Peel back one layer of the rounded end and form it into a cone hat shape.
Attached to the flexible duct tubing with duct tape.
If you have the available fabric, go with the cone shape for improved performance. You could also buy a filter from the hydro store that is made specifically to filter incoming air ducts, but they’re expensive.
Note: this filter will NOT filter out pollen from male marijuana plants. So if your grow tent is located in proximity to places where male plants may potentially release pollen, you’ll need to avoid pulling in this air or you’ll risk fertilizing your female plants which will then produce seeds. Yuck.
Method 3: Use a worn out carbon filter
If you have an old 6 inch carbon filter that stopped effectively filtering your tent or room exhaust, you can give it a second life as a grow tent intake filter. Attach to flexible ducting and run into lower tent holes. Using a carbon filter as a grow tent intake filter is a nice cheap way to solve the problem.
Method 4: Buy a grow tent intake fan filter
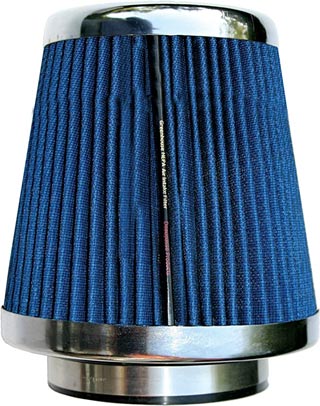
For best results, buying a high quality HEPA filter provides much better filtration than a DIY fabric air intake filter. There are a few models out there made specifically for grow tents.
The Phat 6″ air intake filter is a washable HEPA filter for grow tents, grow rooms, and greenhouse growing applications. It’s $128 bucks though, pricing it out of reach for growers on a budget.
One thing to consider: DIY grow tent air intake filters are cheap to make, but they can’t stop finer particles as effectively as HEPA filters. Mold spores such as powdery mildew are present everywhere, and keeping them from entering your tent could save your whole grow.
Summary
A DIY grow tent intake filter can be easily made with sheets of fabric filter cut to size. While both the flat and cone methods work to filter air, using the cone-shaped filter is the best bet to ensure good air flow once dust starts to collect.
Avoid fiberglass filters if possible, they can cut your hands and – even worse – they can introduce small fiberglass shards that you most definitely do not want to smoke.
Attach your filters to grow tent air intake panels during vegetation, and use flexible ducting to create a light-proof intake during flower. Monitor for dust and change filter fabric every time you begin a new grow.
For maximum filtration, consider purchasing a HEPA filter. Reusing an old carbon filter is a good free option.
How to make an air intake filter for grow tents or grow rooms
Description
Looking to filter air intake for your grow tent or grow room? We'll show you ways to filter incoming air to keep dust & pests away from your weed plants.


")