In this article we’ll discuss different approaches for grow tent ventilation setup. You’ll learn how to ventilate your grow tent using one fan vs. two fans, passive vs. active air intake, and how to calculate how much ventilation you’ll need.
A grow tent exhaust fan removes excess heat and moisture so you can maintain the best temperature and humidity levels for your grow room. Proper exhaust will also ensure an incoming supply of carbon dioxide for your plants. Typically grow tent exhaust setups will use a carbon filter can to remove odors from the exhausted air.
Vent cover (optional if venting outside directly through a window or a wall)
Inline exhaust fans
Your grow tent exhaust fan can be set up to pull air through the carbon filter and then push air through the lighting hood which is vented to the outside world. A 6″ inline fan is the best exhaust fan for midsize grow tents.
Consider buying a fan with a built-in speed controller. A further step up is to choose an inline fan with a humidity controller built in, which helps optimize humidity conditions in your tent. It’s cheaper to buy a fan with these options built-in, but you can also buy them separately.
While using a fan to pull the air through the hood may seem more effective than pushing it, but it also might pull unfiltered air through small cracks or gaps in the light fixture which would mean the exhausted air would smell like marijuana.
Cool tube lights are usually air-tight so this is less of a consideration. But unless your fan is undersized/underpowered to do the job, always push air through the lighting fixture for best results.
How to choose the correct inline fan size for your grow tent/room
Fans are rated by the amount of air they remove. This is measured in CFM’s, or cubic feet of air removed per minute. The bigger the fan, generally the more air it can circulate.
To calculate the amount of air to remove, determine the amount of cubic feet in your grow area by multiplying the height, width, and length.
Try to have the right fan setup to completely replace the air in your tent every one minute, this ensures you will introduce lots of fresh carbon dioxide while controlling moisture and temperature. So if you use a grow tent that is 5x5x7 feet, you’d need to remove 175 CFM to achieve this. Learn more about finding the quietest inline fan.
If you’re trying to decide between a 4″ or 6″ inline fan for your tent, it’s always a good idea to buy a fan that is bigger than your needs and then use a fan controller to reduce the fan speed. This results in a much quieter fan, and there is much less vibration. Plus if you decide to upgrade your grow tent or room you won’t need to buy a larger fan. Learn how to reduce noise from inline fans.
One additional consideration is the efficiency of the exhaust venting run. The venting setup can in some cases greatly reduce the actual amount of air removed. Short, straight runs are much more efficient than long, curved runs.
Plan to multiply your grow rooms volume in cubic feet by 2 to 3 times to reach the final number you need. 2x for short, straight runs, and 3x for longer or frequently angled runs.
Carbon filters
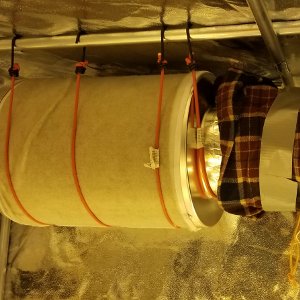
The carbon filter can be set up in your grow tent or room, suspended from the ceiling using bungee cords. It is connected next to the inline fan. In a grow tent, the inline fan can be placed just outside the tent to save on space, but in a larger grow room it can be kept inside.
Carbon filters are available in a lot of sizes. The larger the length of the filter, the more volume of air that gets filtered. Eventually the active carbon will stop working and it will need to get replaced, let your nose be the judge for that.
For most small tent or grow room setups the smaller filter lengths will suffice. Larger grow areas running more powerful exhaust fans with lots of air to scrub will benefit from the longer “big boy” filters.
A big factor in choosing filter length will be how much room you have in your tent. Make sure your grow tent exhaust setup location doesn’t interfere with your ability to fully raise your lights. You don’t want your weed plants to stretch too tall during flowering and then have to redo the location of your filter and ducting because it was in the way of your light. This isn’t an issue in mid-size tents unless you’re using an XL light reflector.
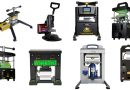
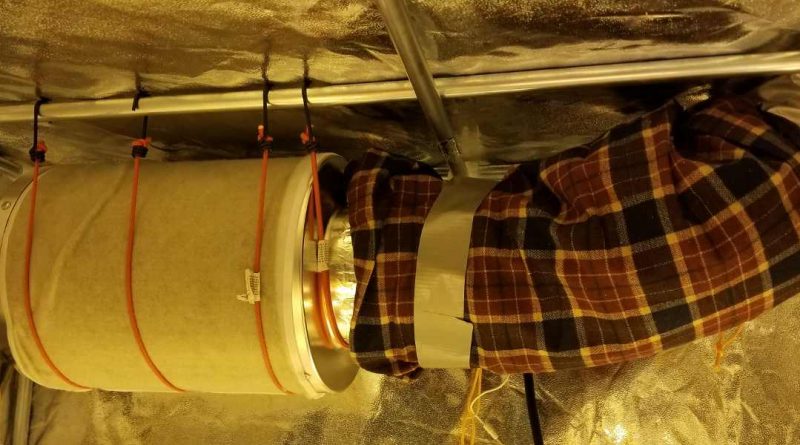
Carbon filter setup
When setting up a carbon filter, the easiest way is to first secure the filter in place and then connect the exhaust using aluminum tape. Metal clamps can be screw-tightened to fasten them securely.
While you probably have a roll of duct tape available, be aware the duct tape is never used by professional HVAC technicians to connect ductwork. Use aluminum tape instead.
Use bungee cords or straps to hang from tent poles on ceiling. Suspending with bungee cords helps absorb any vibration which reduces noise.
Flexible aluminum ducting
It’s critical that your grow tent remains light-proof during the 12 dark hours of flowering stage since even a small amount of light can cause your plants to hermaphrodite.
Be sure to check your aluminum ducting for light leaks after you’ve completed your grow tent ventilation setup. Cheap aluminum ducting tents to have may small holes. Turn on your tent light and stand outside the tent in a dark room to check.
Heavy-duty flexible ducting can resolve this issue, it costs a bit more but the increase in quality easily offsets the risk. Consider spending a few bucks more when you buy ducting and stay safe.
But make sure check for light leaks either way. If there’s just a few small ones you can cover them with aluminum tape. If there’s a bunch, replace it.
Fan controllers
Using a fan controller to exhaust air at lower speeds lets you fine-tune your exhaust rates. It also helps reduce fan noise.
There are a few types of fan controllers available. A cheap fan controller gets the job done in a different way than higher-priced Variac power controllers. The cheap fan controllers for grow tents are good for hobbyists, but they may impact fan lifespan.
Notes about grow tent ventilation setup with one fan
A single 6″ inline fan with carbon filter can be used in small and mid-size grow tents to both cool your lights and exhaust stale air.
You can get proper ventilation in a small grow tent or grow room with a four inch inline fan attached to a carbon filter.
The exhausted air is pushed out which creates a vacuum effect that introduces fresh air through vent holes.
Passive air intake in grow tents differs from active air intake (where an inexpensive small intake fan is used to introduce fresh air).
Both passive ventilation and active ventilation methods can work well in smaller tents (such as 2×2, 2×4, or 3×3 grow tent ventilation setup).
But in larger tents (such as 4×8, 5×5, even a 4×4 grow tent ventilation setup) you should consider using a small intake fan. Grow tent setups using just an exhaust fan will create negative pressure that will suck in the sides of the tent tightly unless you have a very large intake area.
Grow tents have small panels at the bottom you can use to let fresh air in. Be careful using these air intake panels in flowering though since they’ll allow any light in the room to penetrate the grow tent which will cause problems in flowering.
For an easy solution to blocking unwanted light and filtering this incoming air check out our DIY guide to build a grow tent air intake filter.
Cooling grow lights with one-fan passive exhaust systems
Most air-cooled grow light hoods attach to either 6 inch or 8 inch fan ducts. Buy the type of fan that fits your light. If you’re a new grower looking to by an air-cooled light for a small or medium tent, go with 6″
Air-cooled HPS and metal halide lights let you run more wattage with less heat, but small grow tents can still get hot fast. Turning up your exhaust fan can help keep temperatures down a bit.
Using an air conditioner to cool the room around the tent (often called a “lung room”) can help provide cooler air to replace the exhaust.
While it’s technically possible to run a 4 inch fan at full speed with 6 inch connector, it’s much quieter to get a fan controller to reduce the 6 inch fan’s output to reach the necessary exhaust level. But if you already have a 4 inch fan and want to connect it to a 6 inch air cooled fixture, learn how here.
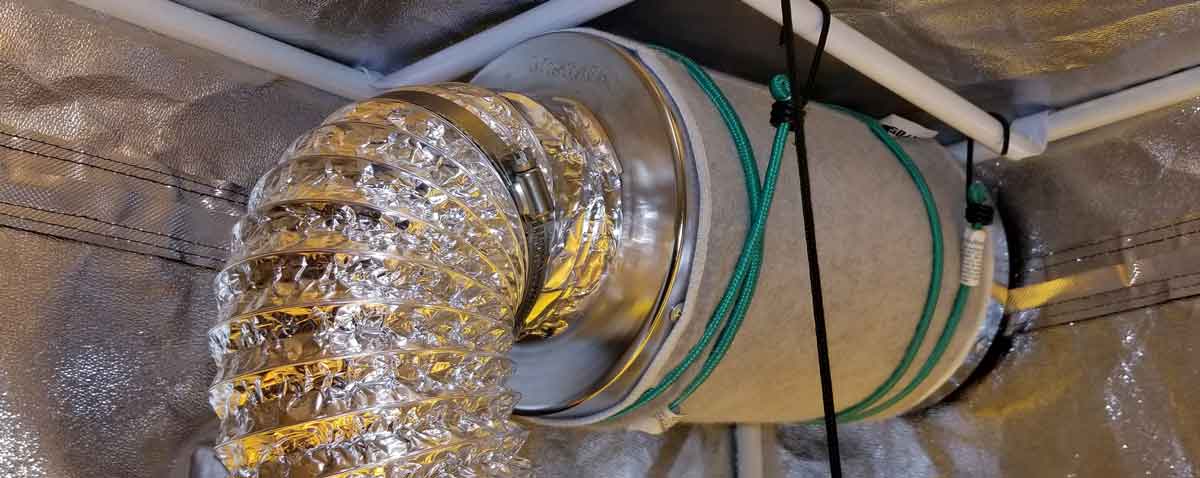
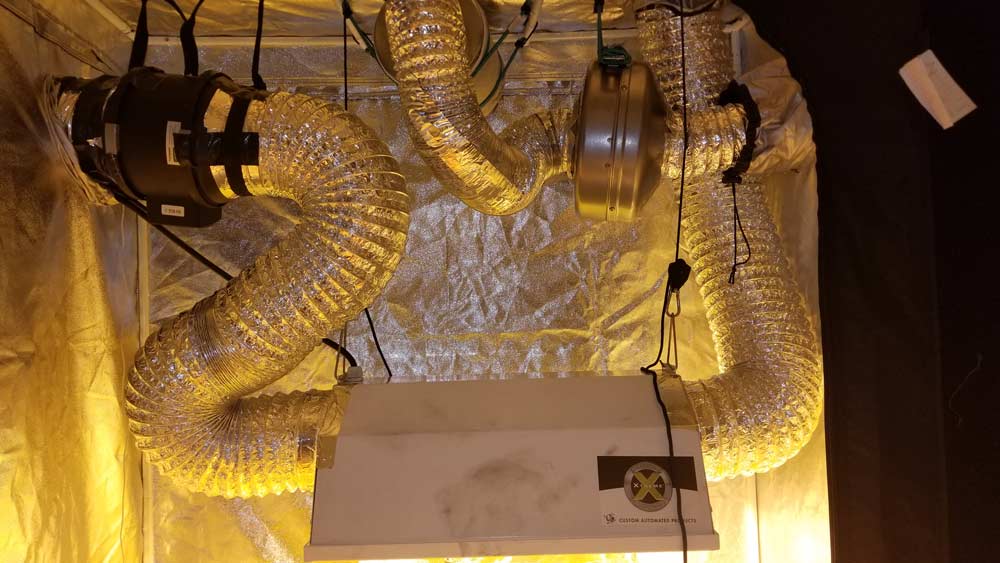
Cooling grow lights and exhaust can be accomplished in your grow tent with two fans, as pictured here, or with a single fan hooked up to a carbon filter and exhausted through the air-cooled fixture. Here a 6″ inline fan is used for cooling lights, and a 4″ inline fan on a fan controller is used for exhaust in a 2×4 grow tent.
Grow tent ventilation setup with two fans: one exhaust, one to cool grow lights
Fan 1: Air-cooled reflector fan
Using two fans for grow tent exhaust setup has several advantages over the one-fan approach outlined above.
Using separate fans for light cooling and exhaust is ideal for 4×4 grow tent ventilation setup. It lets you fine tune the speed of the air-cooled light fixture, while maintaining better control over the exhaust fan.
Air cooled light fans don’t need to run when the lights aren’t running, so you can attach them to your light timer so they only kick in when your lights are on. Use a 6″ inline fan on a speed controller to cool light fixtures.
The air-cooled reflector fan should be located outside of your tent, pushing air through to cool the light hood. Suspend from ceiling with bungeed cords to dampen noise.
Pushing air through grow tent lights is recommended because if you suck air through you risk pulling in air through cracks in the light, which bypasses the carbon filter and can increase cannabis odors in the exhausted air.
Fan 2: Grow tent exhaust fan
The are advantages to using a grow tent exhaust fan separate from the fan used to cool light fixtures.
Use a fan controller to dial exhaust fans down so the air exchange rate is adequate to completely replace the air in the tent at about once per minute. But don’t have it running so high that the tent sides get sucked in. Less air movement rushing through the fan and ducting results in a much quieter cannabis grow.
You can also hook your exhaust fan up to a humidity controller to turn on when needed to keep moisture levels in the tent within range. This is helpful if you live in a. dry climate and are looking to raise tent humidity levels to the 50% range.
If you already own a 4 inch fan and are upgrading to an air-cooled light hood, just buy a new 6 inch fan to cool your light reflector and retain the 4 inch fan for ventilation.
The 6 inch model is also a better buy if you think you might want to upgrade to a larger grow tent in the future, it can be used for 4×8 grow tent ventilation as well as with smaller 4×4 tents or 5×5 tents.
The location of the exhaust fan is optional. In 4×4, 5×5, or 2×4 grow tents you’ll have enough room to suspend the exhaust from your grow tent ceiling using straps or bungee cords to limit vibration.
You can also locate the fan outside of the tent, pulling air out through the carbon filter located inside. This saves space if you’re using an extra large light hood, or if your plants have stretched too far in flowering and you need to move your light higher than expected.
How much air should you exhaust from your grow tent/room?
A few factors can impact exhaust rates: tent size, humidity, and temperature.
There are times when you’ll need to lower or raise the amount of air being exhausted. If you grow in a really hot environment (for example, in the summertime) then you may not achieve enough air movement to properly cool the heat from the light.
Use a digital thermometer to monitor this, preferably one that tracks high and low temperatures so you can see how things are going. Remember that marijuana plants prefer temperatures that are below 80-85 degrees unless you can introduce carbon dioxide, so it’s important that you ensure the right temperatures within your grow area. Grow tent exhaust fans play a big role in maintaining temperatures, among other factors.
Moisture can also impact how much air you need to exhaust from your grow tent. If plants are bushy and transpiring a lot of moisture then the tent may become too humid, so you can offset that by increasing exhaust rates to pull in less-humid external air.
Very large tents should contain a dehumidifier to remove moisture, but for small and mid-size tents (such as 5×5, 4×4, 2×4, 3×3, 2×2) then using exhaust fans to control tent humidity levels is a simpler way.
Grow tent intake fans are small booster fans that attach to ducting to increase air intake.
In small tents or rooms intake fans aren’t required as long as you allow for adequate air intake through the openings at the bottom of the tent. But for medium and larger tents (anything 4’x4′ or larger) you should use an intake fan. Grow tents that size typically require a lot of air to be exhausted.
There’s an easy way to tell if you need an air intake fan. Grow tents will typically “suck in” once zipped up because the amount of air entering doesn’t match the amount getting exhausted. If this is happening for you, An intake fan on a fan controller is a perfect solution to balance this out.
Inline duct fans used for grow tent air intake are less expensive and lower powered than standard inline fans. The small duct booster fans tend to be a bit noisy; a fan controller helps.
Note that you could use a regular inline fan with a speed controller to intake air if you already have one, but you’ll really need to dial it down – you don’t want to push in more air then you’re pulling out to avoid odor problems.
How to keep light from intake holes from entering your tent during flowering
If your tent has small vent panels at the bottom to allow air intake, it’s very hard to make these light proof.
Your best bet is to tape the outside of the panels (which often are velcro) to prevent light from entering during flowering. Gorilla tape is black and thick, and is also very sticky so it does this job nicely.
If your tent has an opening at the bottom designed to allow 6″ tubing (usually an option on better quality tents) you can easily rig up a light proof duct. Take about 8-10 feet of flexible aluminum duct and run it through the lower vent hole. Tape a cloth filter (the kind used on AC vents, cut into a small circle) on the outside opening to prevent dust and bugs from getting pulled into the tent.
To ensure your grow tent air intake is lightproof, leave about 7 feet of that tubing outside the tent, looping it loosely a few times or tying it in a very loose knot.
Be aware that since it’s shiny and silver, light can bounce around the inside of the tubing, so once it’s set up then look inside your dark tent while the lights are on in your room to make sure it’s completely dark. Patch holes with black Gorilla tape or aluminum tape.
And don’t use cheap 6″ flexible ducting, it tends to have lots of small light leaks. Go for the heavy-duty ducting instead.
Controlling humidity issues
If the air inside your tent is still too damp even after setting up grow tent ventilation properly, then the issue may be that the air outside of your tent is too humid. This happens often for cannabis growers in damp climates, or if you grow in a damp area such as a basement.
Proper grow tent ventilation setup provides the heat, humidity, and fresh air control needed for most small and medium tent grows.
Passive air intake ventilation also be used to cool lighting with a single inline fan, reducing the amount of equipment you need to purchase. Adding a carbon filter to reduce odors will ensure that your exhausted air won’t stink up your neighborhood and alert others to your grow.
A second inline fan can be added to cool lights. For midsize and large tents, adding a small air intake fan for grow tents will ensure you can replace all the air you’re exhausting.
Make sure to keep everything light proof. Additional control over ventilation rates can be attained with fan controllers, humidity controllers, and temperature controllers.
Making sure your grow tent exhaust fans are setup correctly will help you dial in your growing environment to make sure you’re growing the best cannabis possible.
Grow tent ventilation setup: How to set up grow tent exhaust fans
Description
Learn how to set up exhaust ventilation in your grow tent using an inline fan to cool your lights while also exhausting stale air to remove excess heat and humidity.


")