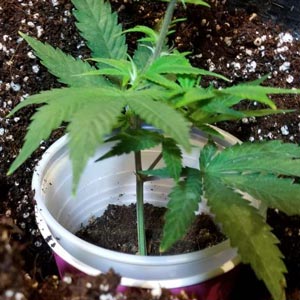
Using coco coir to grow marijuana clones is one of the best ways to clone weedc plants. Knowing how to clone marijuana plants in coco coir is helpful for growers who plan to grow their cloned weed plants in coco for the duration of the grow.
There are many advantages to using coco coir to clone marijuana. Coco cloning will allow cannabis to quickly root in to coco’s excellent drainage. You will have the ability to precisely control the level of nutrients and rooting supplements that you provide to the plants as they develop their root systems. Once your clones have rooted, it is very easy to transplant your clones into their permanent containers.
Best containers for cloning weed in coco coir
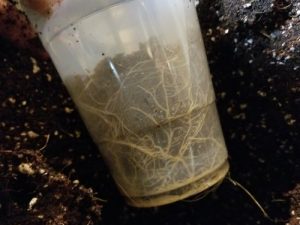
Solo cups may be the best container to grow weed clones in coco coir. Use a clear cup covered by a dark cup so you can easily monitor root growth.
Growing marijuana clones in coco coir is easy to do in the right container. Perhaps the best container to grow marijuana clones in coco coir is to use plastic Solo cups.
You will need to use 2 Solo cups for each plant. The plant itself will go into a clear plastic cup, and then outside of this cup you can stack a red or other dark colored cup that will not let light through.
Planting your weed phone in a clear plastic Solo cups is a great way to be able to monitor the route structure as it grows. Keeping a dark cup on the outside will prevent light from hitting the coco. This lack of light will be beneficial to the root growth since route prefer to grow in dark environments.
If using the 2 cup method, also known as the California cup method, you should make sure to use scissors to cut a bunch of small drainage events in the bottom of the clear plastic cup cop that you are using as the primary container. It is important that this happens so that the water you add can drain out easily. This will prevent the roots from becoming waterlogged and potentially rotting in the oversaturated environment. Never let a pool of water sit in the outer cup or you’re asking for trouble. Plus having too much water will saturate the soil which prevents the roots from growing rapidly.
You are not limited to just growing weed in coco using keg cups though. Any small container would work. You can use leftover plastic planting pots, cleaned plastic food containers or milk jugs, etc. Using dark colored plastic containers won’t allow you to view the roof structure is it grows. Similarly you could grow phones in small cloth grow bags or even plastic bags. But you would need to see the roof structure to monitor rooting progress to see which of your clones is developing the best root structure.
A strong root structure is essential for when you transplant your plant, so it is important that you start to grow a solid structure during the initial phase of cloning and that it continues to develop quickly throughout the vegetative cycle. This will allow for the best overall plant health and growth.
Preparing coco coir for clones
Clones root well in light airy coco mixes, so the first step for preparing coco coir for clones is to break up clumps with your fingers and add 25-30% perlite. This assumes you’re using bagged coco coir that has been buffered; if you’re using coco bricks you’ll need to hydrate them and buffer them.
You’ll want to pre-treat your coco coir with a VERY LIGHT cal-mag mix. Usual recommended cal-mag dose is 3-5 ml/gallon, go for 2-3 ml/gal. If you have a root stimulator such as Canna Rhizotonic, then add that to your solution as well. Adding a starter fertilizer or using 1/4 strength mix of your normal vegging nutrients can be added as well. Don’t overdo it though – fragile forming roots can’t take full strength nutes. Once you see visible roots you can then start upping the ppm of your nutrients.
Water your coco coir 2 days before your plan to clone (1 if you need to) to let the coco medium fully saturate. Then your coco coir will be ready to accept new cuttings. When you’re ready to clone just poke a hole with a kabob stick to the depth you need to bury at least one set of nodes below the coco level.
Best type of lighting to use to clone marijuana plants in coco coir
CFL lightbulbs are a good choice for growing weed clones since their light is not too warm or intense for young pot plants.
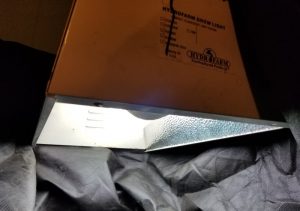
Marijuana clones do best in a relatively low light situation compared to their performance in the vegetative and flowery stages. You will want to avoid using very strong lights such as high intensity discharge (HID) lights – such as metal halide (MH) or high pressure sodium (HPS) – for clones. They offer too much light intensity and too much heat for your young plants.
Using CFL light bulbs to clone marijuana is ideal. Plan to use a larger CFL bulb designed for this purpose, but some growers also get away with using other alternatives such as running multiple household CFL bulbs.
LED lights are also a great option for marijuana clones, as they tend to have a very low heat output compared to the high intensity lighting options.
You can also grow weed clones using indirect sunlight. Pick a bright north-facing window. Avoid direct sunlight which will harm young unrooted clones.
How far should grow lights be placed for marijuana clones in coco?
It is important that your new coco clones get us enough light but make sure that your light is not too close to the plants as the excess light intensity and he will not help things.
If you’re using CFL bulbs, the heat is not an issue nor is the intensity, so the light can be placed around 12 to 16 inches above the plant.
If you don’t have a CFL or LED to grow your clones in or just using your metal halide or HPS light, you will need to make sure there is a lot of distance between them such as 2 feet or more and you will also make sure to use a humidity dome over them to in sure that the heat from the lights does not dry out the plants faster than the roots can update the liquid.
How many hours of light per day should weed clones get?
Marijuana clones need 24 hits or 18 hours of gentle light each day. Many growers run their clone lights for 24 hours which is great since you won’t need a timer.
How long will it take to grow roots on marijuana clones in coco coir?
This weed clone is showing roots 7 days after being cloned in coco coir.
We have found that it typically take about one week to grow roots to develop on marijuana clones in coco coir. This timeframe for how long it takes roots to develop on weed clones can very depending on several factors, including the amount of water in the coco medium as well as whether a rooting hormone was used.
It is recommended that you use a rooting hormone specifically made for weed to speed up the process of the pot plants developing roots.
There are several varieties of rooting hormone available for growing weed clones, commonly they are in either a gel or powder form. The gel does a great job of staying on the clones, so this is a good idea for beginning growers looking to ensure the most success.
If you use powdered rooting hormone then some of it does rub off as you push the clone into the coco when you’re setting the clone.
It’s possible to not use any rooting hormone and still have nearly 100% success rate. As long as the humidity within the cloning environment is high, the plants will be able to get moisture from the air while the roots are waiting to develop. Without the hormone they may not develop as quickly though. Once your clones have developed a strong root system you’re ready to learn how to transplant rooted weed clones.
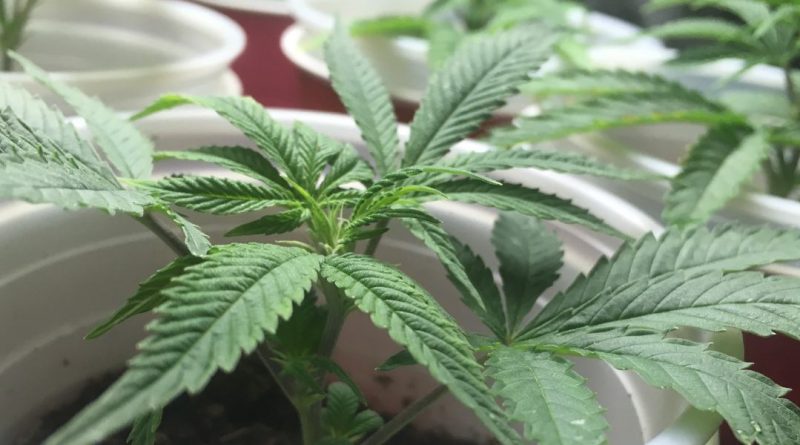
How to cut marijuana clones
Select growth tips from your mother plant that have at least one set of nodes (where leaves and growth tips come out of the stem). These nodes will form roots once places underneath your coco.
Pluck leaves off the lower nodes. Using a new razor blade I tend to make small upward incisions just barely grazing the Gambia layer, the light green layer on the outside of your stems. This makes additional areas for roots to develop beyond the node area. Go easy on this or risk cutting your stems right off.
Use a bamboo skewer to create a vertical tunnel for the new clone stem in your nee coco container. Dip the clones in rooting hormone or cover with rooting gel and add to the hole, patting gently around edges to remove air pockets.
Do this quickly and don’t let the clones dry out for best results. If your cut clones sat for a bit before planting, cut another 1/4″ off of the end right before planting to ensure air bubbles don’t form at the cut end.
Using a clear plastic dome over your new marijuana clones will ensure a high humidity level that allows the plants’ leaves to absorb moisture from the air until their roots have formed.
Using a clear plastic dome to clone marijuana plants
Since your new phones will not have a root system in order to pull in the moisture they need, it is essential that they can get this moisture from the air.
The number one thing you can you do ensure success of your phones is to make sure that you have a humidity dome over them to trap in the moisture. I have found that were not using the dome none of my clones would survive. But when using a dome, nearly all of them do. Domes are inexpensive and well worth the investment.
An additional trip to develop clones quickly is to put a heating pad underneath the tray underneath the dome. This additional heat helps the clones grow quickly. It is a tactic used commonly at large-scale operations in order to get a lot of clones at a high success rate. For the beginning grower it would be helpful, but it is not necessary.
How much water should you give marijuana clones in coco coir?
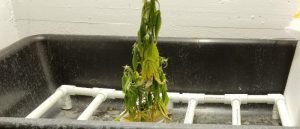
It is important that you properly water weed clones growing in coco to maintain plant health. This sad looking clone was underwatered.
Keeping the coco damp but not wet will help encourage the development of the roots. If a plant is placed in too moist a growing medium, the roots will not try to grow to find moisture to get into the plant. This negatively impacts the speed of root growth. It is best to have a lightly moist environment so that the plant is able to survive but also to encourage her to reach out with its roots to get additional moisture.
It is important that the coco is completely moist but not overly saturated in order to foster a good root development in your new weed clones. Dry pockets in the coco medium mean that the plant will not be able to develop roots that are capable of getting moisture to the plant, and this will affect your success rate.
If the coco is too damp, there are several things you risk. One is that the plant will not develop new roots quickly because it does not feel the need to reach out to get additional moisture. Another risk is that if it is too moist you may rot the roots out which will kill the plant.
For best results pre-treat your coco with a small amount of water (with nutrients and properly pH’d) and let it sit for a day or so prior to the cutting of the clones. Coco is very absorbent and this will give time for the moisture you add to evenly spread. If the coco coir seems too wet you can just let it dry out a few days before adding clones.
Make sure to have cut vent holes in the bottom of your solo cups or containers so the excess moisture can drain away. Water sparingly. This is the best way to prevent too wet coco from harming your new clones.
How much water should you use for coco cloning? Assuming you’re running pre-moistened bags of (with 25-30% perlite for improved drainage) in a solo cup about 3/4 full and add approximately a third of a cup of nutrient/rooting solution to this. Let it be dry out a bit at the top of the cup before adding more, it is really important not to over-water at this point. If you use bricks of dried coco, you’ll need to pre-soak these per the label instuctions ahead of time and buffer them since these bricks are too dry to be used as-is.
Remember the coco must be moist, but never wet or waterlogged for the plants to root properly.
Using Canna Rhizotonic will help encourage root growth in weed clones grown in coco coir.
What type of nutrients should be used for rooting marijuana clones in coco coir?
It is recommended to use a root enhancing additive as well as a very light mix of nutrients for your coco clones. A very light mix of most companies standard nutrient mixes designed for vegetating marijuana would be great for growing your clones.
I typically use Canna Coco nutrients for my coco grows. During the cloning phase I use lots of Canna Rhizotonic which is designed to help a plant quickly develop a solid root structure.
In order for Rhizotonic to work correctly it is important that you do not have to high a ppm level with the other nutrients that you use in your watering mix. This is recommended by Canna for best results.
Rhizotonic is also can be used as a foliar spray (misted directly on your plants’ leaves) which would really reduce the amount of product that you use and save your money. Note that the ratio for foliar spray applications is different from the ratio needed for absorption directly through the roots from the coco medium.
For standard watering of clones you can add Rhizo to the coco in a strong ratio, and then scale back to 50% of the recommended Canna schedule during the actual vegetation cycle.
Typically for a 5 gallon bucket fill up, for a light dose you could use 20 to 25 mL of Rhizotonic for vegetating plants. Double that ratio during the initial cloning stage and early in veg in order to get the most root development quickly. After a few weeks of veg you could then scale that back to 20 mL per 5 gallons of water.
During flowering Canna recommends still using a small amount of Rhizo, but by the end of 3-4 weeks of vegetation the roots have developed enough that you may not need to continue to use Rhizotonic at that point. Most growers prefer to limit uneccessary additives wherever possible.
Canna A and B can be used in low dosages to grow marijuana clones in coco coir once the root system appears.
In addition to Rhizotonic,use a very light mix of Canna A and B in your coco, even lighter than Canna’s recommended amount listed on their feeding schedule for rooting clones.
If you’re only cutting a few clones at a time they won’t require much liquid. Try mixing up the nutrient solution for clones in a small bottle such as a half gallon apple juice bottle. Don’t mix up too much at a time, because you will not need to re-water your coco clones very often during the initial rooting phase and after a week or so you will need to discard the solution and makes a new batch anyway.
You’ll need to pH your clones’ nutrient solution to around 5.8 when growing in coco. The typical pH range used in coco grows is 5.5 to 6.5. 5.8 seems to work well. Learn more about the best pH for growing weed in coco coir.
You do not add additional products such as a calcium and magnesium booster (such as CalMag) in the coco for my clones. For coco grows, plan to use CalMag as soon as you transplant the clones for the vegetation cycle. Not using Calmag may result in some deficiencies with Ca and Mg.
For preventative measures you can use CalMag in the veg stage well below the recommended doses of 3 to 5 mL per gallon ;perhaps 1 to 1.5 per gallon for this precautionary treatment every time you water. Learn more about how much CalMag to use in coco grows
A few days into the cloning phase check the clones to make sure that there’s still enough moisture in the coco. If watering is needed, before adding your previously mixed clone nutrient solution always check the pH of the stored solution as it often tends to climb from the initial reading taken a few days previously. Just lower the pH back down to 5.8 if necessary.
Nutrient schedule for growing weed clones in coco
Multiple growers report a 100% success rate for clones using the Canna Coco line with the following ratio:
1/2 gallon water
2.8 mL each of Canna A and B (make sure to use equal amounts of each)
3.8 mL Canna Rhizotonic
Once the rooting is completed in about 7-14 days clones can be transplanted into permanent containers such as 5 gallon cloth bags that can be used for the duration of the grow.
Can marijuana plants be cloned using other methods besides coco?
If you are planning to grow your plants in coco coir it makes sense to clone them in coco as well. But you certainly are not limited to using coco to clone plants that will eventually be grown in coco.
There are several types of products commercially available for cloning, such as rockwool cubes, plugs, or other hydroponic methods. You can even grow marijuana clones directly in a cup of pH’d water with a root stimulator such as Rhizotonic.
All of these methods complete successfully to clone plants, so it’s really a lot a question of preference and what materials you may have available at hand.
Since the average coco grower already has the materials they need to clone in coco is well this is typically the easiest and most practical solution for most growers.
Can you transfer a soil clone to coco coir?
If you have cloned your cannabis directly in soil, it’s very easy to transplant that soil clone to coco coir. Just prepare your coco coir for clones using the steps above and dig out a little area for your clone’s roots. Gently remove the clone from it’s soil container, gently removing excess soil not part of the root system. Try not to disturb the roots as much as possible. Gently place it in the hole you dug out in the coco coir container. Gently pat it in.
If your clone is root-bound when removed from the soil container, make sure to tease out the roots with your fingers and try to have these roots spread out a bit when you place it in the coco. This ensures the roots can easily stretch out to find new water. Gently water the coco with a light vegetation nutrient solution and Cal-mag, pH’d down to the 5.8 range. Continue to treat it with care as you would any other coco plant and your soil clone’s roots should adapt to their new coco coir environment nicely.
Cloning marijuana in a perpetual harvest schedule
Running a perpetual harvest schedule for marijuana grows ensures a constant supply of plants for flowering.
If you grow an 8-week flowering strain, you will want to have your new clones fully vegged out by the end of the 8th week so they can immediately enter the flowering tent once the previous run is harvested. Many growers veg plants for 3-5 weeks typically. If you prune heavily then vegging plants for 4-5 weeks will limit overall plant height.
In a perpetual harvest you will take clones from your vegging plants and then flower those parent plants immediately for 8 weeks. Assuming you root and transplant the new clones after 2 weeks, these clones still have another 6 weeks of time before there will be room for them in your flowering room. 6 weeks of veg will result in full, tall plants. Since plants stretch during flower up to double the initial height, 6 weeks of veg may be an issue for you depending on ceiling height. A way to keep this in check is to keep clones in solo cups for 3-4 weeks total which limits their growth a bit compared to after they are transplanted, when plants will quickly flourish. If you keep clones in cups for this reason, they’ll dry out quickly at the end so check the water at least 1x per day.
In this perpetual harvest schedule example, factoring in 1 week for root development and 2 weeks resting in the cups equals 3 weeks total. This leaves you with 5 weeks of vegetation before these plants are ready to flower in the perpetual harvest cycle. By topping and training these growing plants extensively you can limit their height in that 5 week veg period so they’re the perfect height to switch to flower by the end of week 8.
Learn more about how to grow a perpetual harvest to ensure you always have new plants ready to replace the recently-harvested plants in the flowering room.
How to prevent weed clones from getting root bound
It is important that you do not leave marijuana clones that have rooted in the small containers for too long or the roots will begin to circle the cop in the plant will become root bound in the container.
A root bound plant will potentially constrict itself, and they should be avoided as much as possible. But don’t be concerned if there is some wraparound of your roots within the cob. The better the rule development the more successful your transplant will be in the quicker your plan will start to flourish in the vegetative stage.
If you keep clones in the smaller containers intentionally for reasons such as your perpetual harvest, some level of root bound growth is very likely. Just loosely separate the roots when transplanting to limit the possibility of negative effects of being root bound.
Common problems with cloning marijuana plants in coco coir
The most common problem with cloning in coco coir under a humidity dome is having the medium too moist which prevents the roots from growing quickly. However if your plants look like they are growing healthy even if you don’t see the roots after a week the chances are you may still be in good shape. Give it a few more days and check again.
Just remember next time to reduce the amount of liquid you start with in this will increase the chances of quick route rooting. Make sure if using the 2 cup container method that you never let your plant stand and standing nutrient solution in the second cup, or else you risk root rot. Too much moisture is never a good thing with clowns but if you really have too much she will definitely kill the plants even after they establish roots.
If your cloned have the problem of yellowing leaves, it means the nutrient solution you were using is too weak and needs to be slightly increased.
If you notice yellowing tips on your plants it means the nutrient ratio is too high it needs to be backed off. Very slight nutrient burn at the tips is not really too bad of a thing, but is important to monitor closely to make sure that it doesn’t increase because overtime this will cause problems for you if left on dealt with.
Never let the roots dry out. Weed clones grown in coco are fairly resilient if you catch underwatering right away before the plant leaves droop too much, but it’s best to keep a close eye on the roots to ensure they don’t get too dry. As the root system develops, more frequent waterings are needed.
Coco cloning: how to clone marijuana plants in coco coir
Description
Learn everything you need to know to clone weed successfully in coco: how to prepare the coco, how to take cuttings, lighting, humidity, nutrients, & more.


")