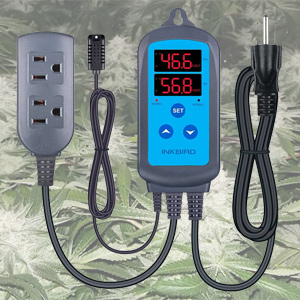
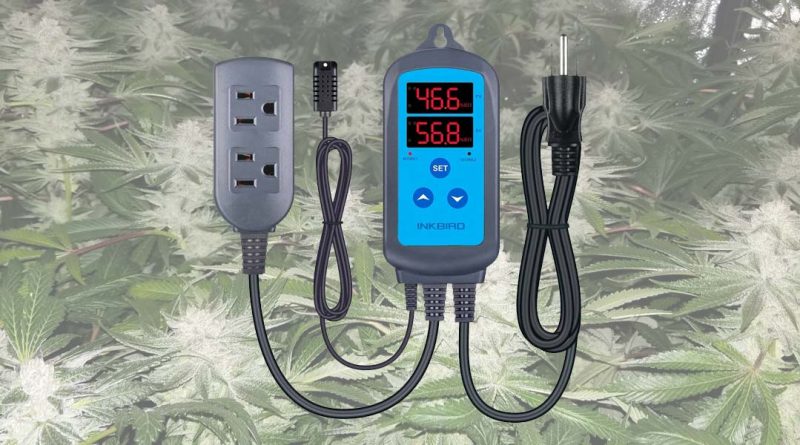
The Inkbird IHC-200 humidity controller is helpful for cannabis growers looking to maintain proper humidity levels in a grow room or grow tent. It allows you to turn on a humidifier when the humidity levels drop below a specified threshold, and to turn on a dehumidifier, air conditioner, or exhaust fan to when humidity levels get too high.
In this article we’ll provide an Inkbird humidity controller review and discuss how to set up your controller to create the optimal environment in you grow room or grow tent for your weed plants.
Unfortunately the Inkbird humidity controller instruction manual is hard to understand and it seems poorly translated. Or maybe I was just too high. But thankfully the controller’s default settings are pretty close to what you’ll need to use it for your grow room.
The Inkbird IHC-200 comes set up to maintain 45%–55% humidity out-of-the-box. The default setting is 50% with a low differential of 5%, and the high differential of 5%. This means that it will automatically maintain a range of 45%–55% by turning on a humidifier below 45% and turning on a dehumidifier in conditions above 55%. This is the ideal humidity range for most grow room conditions.
The controller allows you to change the setting of the humidity level and range, so if you want to increase the default settings just follow the steps below.
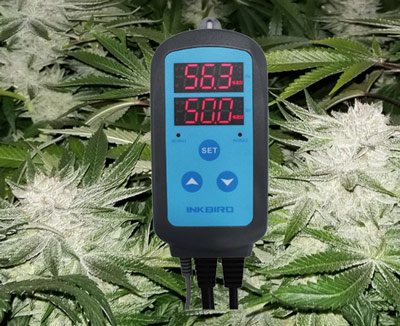
The controller face shows two values. The top number is the current humidity during operation (and it can show current temperature if you hold down the up and down arrow buttons simultaneously). When you’re setting the unit the top number displays menu codes. The bottom value shows the set humidity level during operation, and the humidity set value during the setup process.
To set you base humidity and the high low range, hold down the set button for 3 seconds. This brings up the humidity level setting. Keeping the button held down, hit the up or down buttons to adjust. It’s important to keep the set button depressed while you adjust the level, otherwise the setting won’t save. Alternatively you can hold down the set button for 3 seconds after changing the values to save them. If you are inactive for 10 seconds while programming the device it will cancel the setup process.
Once the base level is where you want it, hit the button again to bring up the low setting variance. For example if you’re looking to keep your grow room range between 40 and 60, set the humidity for 50 and then set the low differential to 10 (holding the set button down while you adjust). Then hit the set button again to show the high humidity differential, and while still holding it down set the high range to 10 as well.
Hit the set button again to set a high alarm on the controller, and hit set again to set up the low alarm value. This is helpful in case your plugged in devices don’t work as expected. For example if your humidifier tank gets empty, your dehumidifier bucket is full, your AC stops working, etc. Hold down the set button and use the arrows to change those values. By default the low alarm is at 1% and the high is 99%, so if you want the alarm you could change those to 30 and 70 respectively since if you let humidity go to 99 before the alarm signals it’s more likely you’ll run into issues such as mold.
To see the currently set high or low values while the controller is running just quickly tap the up or down buttons and they’ll briefly display.
After setting the high and low alarm levels hit the set button again to display the delay protection time. By default this is one minute, and it can go up to 10 minutes. You may want to adjust this if your devices are turning on and off too frequently. For example content on and off cycling isn’t good for air conditioners. For most users the one minute setting will be sufficient.
The Inkbird humidity controller has two small lights on the left and right that show when one of the two outlet plugs is receiving power. If those lights are flickering, this is an indicator of delay protection.
A word of warning – don’t place this controller directly in your cannabis flowering room or grow tent unless you block the red display on the controller face. The numbers are bright enough to risk interrupting the necessary 12 hours of total darkness and that light could cause your female plants to hermie and grow seeds. It’s better left out of the tent or grow room.
The controller comes with two input plugs, labeled “Work 1” and “Work 2.” Work 1 is where you’d plug in the humidifier and Work 2 is where you’d plug in the dehumidifer/AC/exhaust fan. Why these plugs aren’t labeled “humidifier” and “dehumidifier” is beyond me.
We’ve used the Inkbird IHC-200 controller for a few scenarios when growing weed and have found it to be very helpful. In dry conditions we have used it to turn on humidifiers in a grow tent that had a constant exhaust fan running, so the incoming air was constantly drier than ideal. The Inkbird is also helpful for situations in medium and larger grow tents where a dehumidifier is placed right inside the grow space and is set to run only when humidity exceeds 65%.
We have also used the Inkbird humidity controller when drying cannabis plants in tents in overly dry conditions. In that use case we attached the Work 2 outlet directly to the exhaust fan so that it would kick in when humidity levels hit 60% and stopped when the dry incoming air brought the tent’s humidity down to 40%. The controller was very helpful for this scenario since the tent was in a room that was only 25% humidity, too low a level to facilitate a slow 7-10 day dry. The drying plants gave off enough moisture that the tent humidity would slowly but constantly be climbing the first few days, and when it got too high the exhaust fan would clear it out and introduce lower humidity air again.
The Inkbird has a 5 foot power cable to plug into a wall outlet, working with either 120v or 240v humidifiers or devices. Both plugs are rated for 12 amps.
The 2 plug I put spots are attached to the device with a one foot cord. The humidity sensor cord is 6.5 feet long. The device is accurate to within a plus or minus of 3% relative humidity (RH). The device uses less than 3 watts of power.
We’ve found the Inkbird IHC-200 humidity controller to be very useful in helping maintain proper grow room or grow tent humidity levels for growing marijuana plants. It is fairly easy to set the inkbird humidity controller despite the poorly translated instruction manual using the steps above.
Our overall experience has been positive to date, and its been a big help for creating a proper environment for both growing and drying cannabis plants. It’s fairly inexpensive at just over $40 and we’ve been using it for a while in a grow tent for to create the right environment for growing and curing weed. Recommended.
Inkbird humidity controller: review and usage instructions
Description
In this Inkbird humidity controller review we discuss how to set up and modify your controller to create the perfect grow room or grow tent environment for your weed plants.
 The controller allows you to change the setting of the humidity level and range, so if you want to increase the default settings just follow the steps below.
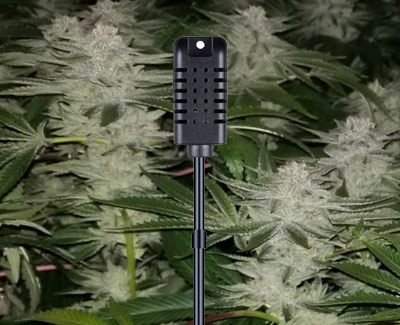 After setting the high and low alarm levels hit the set button again to display the delay protection time. By default this is one minute, and it can go up to 10 minutes. You may want to adjust this if your devices are turning on and off too frequently. For example content on and off cycling isn’t good for air conditioners. For most users the one minute setting will be sufficient.


")