Once you’ve successfully rooted your marijuana clones or germinated your seeds you’re ready to learn how to transplant weed clones into coco coir. Learn how to grow weed clones in coco coir or how to grow weed seeds. Transplanting marijuana clones into coco is pretty easy to do as long as you know a few basics.
In this article we’ll discuss how to tell when your weed clones are ready to transplant, how to prepare the coco coir, the proper nutrient schedule for transplanted weed plants, how to plant the weed clones into the new container, the proper light schedule for transplanted clones, and some important tips regarding pruning your new weed plants.
How to tell when marijuana clones are ready to transplant
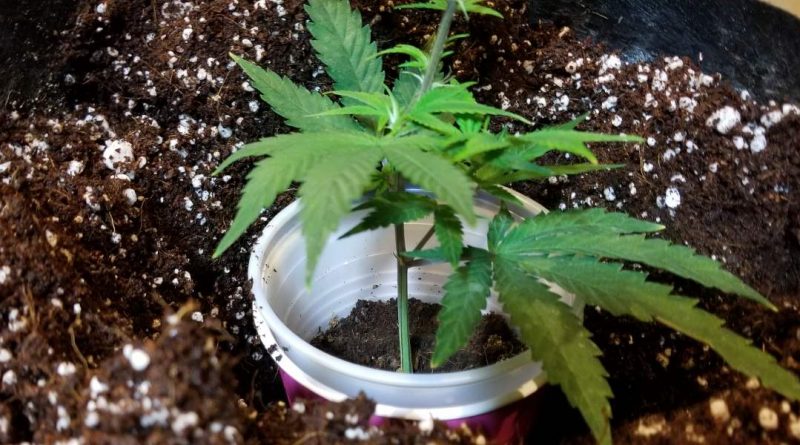
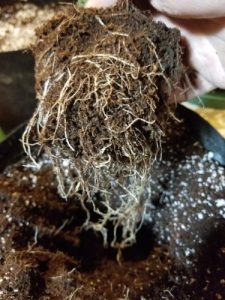
This marijuana clone grown in coco coir is getting rootbound and needs to be transplanted right away.
Knowing how to tell when marijuana clones are ready to transplant is very important in order to establish healthy plant growth during the vegetative phase.
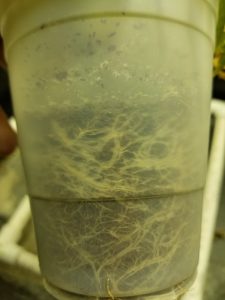
How long should clone roots be before transplant? Don’t transplant clones at first sign of root growth. If using a clear plastic cup with coco for your weed clones, you will notice the small white roots start to grow down towards the bottom of the cups and the sides. They may even start to grow their way out of the little vent holes are cut in the bottom of your cups, which is fine. It’s just the roots way of looking for more moisture.
Make sure to give the clones at least 3 to 7 days in the cups after you first notice root development in order to ensure that a high quality root structure is available for the transplant. The stronger the rooting system, the more robustly the plant will establish after transplant.
Once you have rooted your clones, you can then transplant them into the final container that will be used throughout their growth cycle. Knowing how to transplant weed clones properly into coco coir is not difficult.
How to prepare the coco coir for transplanting
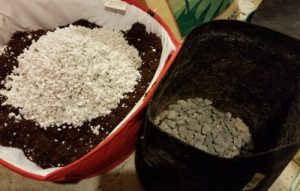
Prepare your coco for your weed clones by adding a layer of rocks for drainage and amending the coco coir with perlite.
The first thing you will need to do is prepare the coco in the larger containers that your transplanting to. Mixing about 20-25% perlite with your coco will ensure nice drainage in the growing medium. This is helpful to prevent waterlogged coco as well as to develop good stronger and structures for the plant.
Be very careful when handling perlite, it is very dusty so you should wear a respirator mask. Pouring some water on the perlite will reduce the dustiness considerably.
For better drainage, try adding a thin layer of washed gravel or clean clay pebbles at the bottom of your pots. Cover this with the mixture of coco and perlite.
Pretreating coco with nutrients ahead of transplanting
It’s best to pretreat your Coco at the at least a day ahead of time. In this example we’re using Canna Coco line with a fairly light mix of Canna A and B nutrients, Canna Rhizotonic, as well as some Calmag Plus.
Water a light mix of nutes to runoff and let coco sit for a day ahead of transplanting your weed clones. Don’t let container sit in runoff water.
How much nutrients to use after you transplant a clone varies based on the nutrient line. Go for a very light initial mix, properly pH’d. In this case using Canna coco nutrients our goal is 780 ppm. To mix a 5 gallon bucket, this would be 35 ml Canna A and B, 48 ml Rhizotonic, and 15 ml of Calmag Plus.
Rooting enhancers are important to encourage quick growth in their new home. With rooting enhancers you’ll want to go full strength. Similarly when using Calmag, for the initial pretreating going with a higher ratio helps prepare your coco nicely.
If you are reusing coco you should add a double dose of Cannazym or other enzyme to break down old root growth in the coco. But unless you need to reuse coco for financial reasons, it’s always best to use new coco when transplanting clones so you don’t inadvertently introduce disease, mold, or other issues from your previous run.
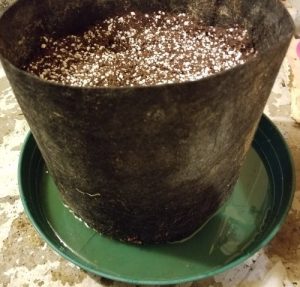
Water your coco in their containers until runoff. Water slowly and evenly to ensure all of the coco gets saturated. Don’t let the containers sit in the runoff water too long.
If you didn’t pretreat your coco, the same rules apply. Use a light nutrient mix and water until runoff.
How to transplant weed into coco coir
If you pretreat coco let it sit for a day or so and then you’re ready to transplant. If you want to transplant right away and your coco is dry and dusty, it’s best to lightly water the medium and mix it with your hands and break up any chunks.
To transplant weed plants into coco coir, first you’ll need to dig out a little hole in the center of the larger container. Dig down a bit deeper than that amount of coco that’s in the cup though so that the longer plant roots can hang low and be spread out a bit with your hands during the process. Break up any chunks of coco. The new container should be gently packed. If you are using fabric pots, make sure to push coco to fill out the bottom corners to prevent air pockets. Your goal is to gently pack it in, so it’s firm but not compressed enough that roots can’t easily grow through it.
The importance of root development
Gently loosen the roots of your marijuana clones before transplanting. Spread the roots out within the new container before backfilling the coco/perlite mixture.
The most important thing to growing good marijuana clones at this state is to focus on root development.
Once you are sure that your clones have developed a strong root structure for the transplant and that the container you’re transplanting them to has the proper amount of moisture in it – not too wet but not to dry – then you are ready to begin the transplant.
Be careful when removing clones from their container
It is important to remove the clones from their containers as gently as possible to not risk disturbing the root structure during transplant. Give the cups a light squeeze on the bottom and sides to loosen everything up. Then slide the coco an plant out of the cup as gently as possible.
Assuming that the coco where the clone has rooted is slightly moist it usually stays together fairly well, so you can quickly get it down into the hole in the larger container and spread out the roots. Then backfill from the sides gently. Avoid leaving any air pockets which will damage existing roots.
Don’t let the plants sit too long outside of their cups, you don’t want the roots to dry out. If the coco is dry and crumbles when you lift it out, try to gently transfer — spread out the roots and pat the coco lightly around them.
Be very careful when removing the clones from the solo cups and make sure not to pull on the stem which could lead to a disastrous results of snapping off part the root structure prior to the transplant. It’s best to gently squeeze in the sides of the cup before removing the plant to loosen things up, paying attention to the bottom if you have a good sized root structure. Place your hand over the top of the cup and gently flip it over. If it doesn’t slide out easily, gently squeeze the edges of the container. Try to keep the coco in the root ball intact as much as possible.
How to tease out the roots
Teasing out the roots encourages them to grow outwards. If your plants are rootbound in their cups, gently use your fingers to separate out the roots as best you can. Guide them outwards from the plant to help them set evenly in the coco bed. This sets you up for the best results later so the roots develop evenly within the larger containers you use for the plants.
You want to make sure your roots aren’t balled together or this will reduce how quickly your plants will grow. If your plant is really root bound, pay extra attention as the roots may be packed together in a circle. Encouraging these roots to point out into the new container will help the plant establish itself quickly, so make sure to break up any roots tightly wrapped around the plant.
As you set the root ball in the new container, don’t just let longer roots hang straight down. Guide them down and outwards in all directions, and gently backfill around them.
If you’ve got a long root structure you can do this in layers, first backfilling around the lower roots. Gently tamp the coco down, and then the tease out a layer of roots into the middle and backfill. Repeat for the top. By spreading out the roots properly at the onset you’ll help the plant establish itself quickly. If you’re using a cloning machine you will have longer roots so this method works well to more completely fill out the structure within the new container.
Create a slightly concave surface and water the new plants
Once transplanted, gently pat the coco surface flat in the container. Fill in cracks at the edges of your pot. Aim for a slight concave surface so that the plant stem rests slightly lower than the edges so water pools in the middle evenly and doesn’t run down the sides. Don’t make this too rounded though or else when you add water it won’t reach near the edges of your container. Your goal is to saturate the entire surface each time you water. Even watering which supports root growth in the entire container.
Water your plants by filling them in around the outer perimeter, watering to runoff. If the watering causes holes to develop in the surface of the coco, fill it in and pack it down gently to preserve the concave shape.
If you were using cloth grow bags you may need to adjust this surface near the edges again after moving the bags because often the sides of the cloth container will push in and create gaps on the side where your nutrient solution will this quickly wash to the bottom. Carrying bags with handles tends to do this, if you carry them from underneath it will help preserve the shape. It is important that the water distribution occurs as evenly as possible throughout the rest of the growth cycle to avoid dry spots in the coco medium.
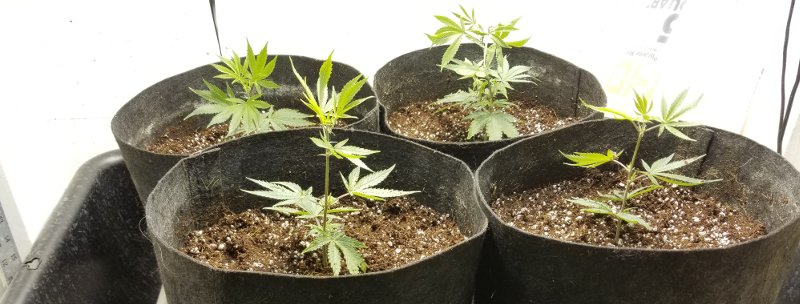
After you have transplanted your weed plants into their new coco coir containers, your plants are ready to go under an 18-hour-on, 6-hour-off light cycle during the vegetative stage.
What comes next after transplanting your marijuana clones?
What is the best amount of light for transplanted weed clones?
After transplanting, the vegetation cycle of marijuana growth is now underway. Place the new plants under lighting for vegging on an 18 hours on, 6 hours of darkness light schedule each day. Learn more about selecting the best grow lights for your weed plants.
It is important during the first few days that you keep this light well above the normal distance you would use if using a metal halide bulb. Try for at least 20 inches at this point because the plants are very fragile and if the light is to close the heat may start to dry them out before the new roots can take on enough moisture in order to keep the plants healthy.
After a few days of moderate growth, if the plants seem healthy then drop down that light a bit closer so that the light intensity will increase in the plants can start producing more energy to fuel fast growth.
How much water is needed.
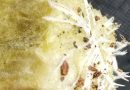
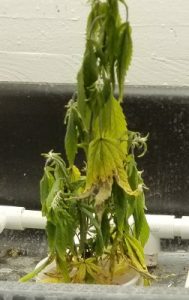
Let your coco dry out a bit between waterings after transplanting to encourage roots to grow. But don’t let your plants dry out too much, as shown here!
Since coco was saturated prior to transplanting of the marijuana clones, it should take a bit of time for the roots to absorb enough water to necessitate re-watering. The smaller your container, the quicker you’ll need to rewater. Lifting your containers is an easy way to tell when they’re getting dry, they’ll get much lighter.
The roots of your weed plants will grow in search of water, so for the first week it helps if you let your coco dry out a bit. If you continue to water daily the roots won’t grow as vigorously.
Don’t let the coco coir completely dry out either. If you notice drooping leaves or growth tips and the coco seems dry you need to water immediately, and next time don’t let it dry out so much between feedings.
Watch plants for nutrient burn or deficiencies
Monitor your newly transplanted clones very carefully during the first week for nutrient burn. If the tips of your plants start to turn yellow this is nutrient burn, you will know that the nutrients salt in your coco is a bit too high. A recommended solution would be to flush the plants until moderate run off with pH’d water to remove some of these excess salts that may have built up.
Typically this will not be a problem if you use a very low ratio of nutrients in my solution at this point, but if you are for example reusing your coco from the previous grow – not really recommended, but possible – then you may have existing nutrient salts in there that are affecting the plants at a very early stage. Always flush coco several times before reusing. Better yet, use new coco coir every time.
It is crucial that your plants have enough nutrients, but not too many during this phase in order to continue to develop healthy growth.
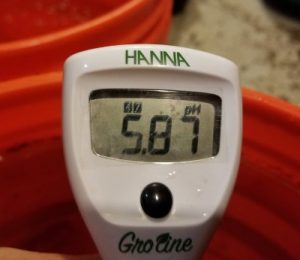
It’s important to maintain a pH range of 5.5 – 6.2 when watering your newly transplanted marijuana plants. Keep most waterings at 5.8 for best results.
Another sign to watch for is too little nutrients reaching the plants. You want the leaves – particularly the newest growth – of your plants to be a nice dark green. If you notice that the leaves are getting kind of pale, it means that your nutrient mix isn’t strong enough in terms of PPMs for the plants’ healthy development and you will need to increase. Improper nutrient absorption also can be caused by improper pH levels, so make sure you know how to maintain proper pH levels in coco coir.
Keeping a grow journal we are right down all of your nutrient mix and your feeding schedule is a great idea in order to understand the best ratio is needed for a particular strain if you are continually cloning it. By the second or third time you will know exactly what you need to do to have enough nutrients but without getting nutrient burn.
Remember to make sure to let newly transplanted clones nearly dry out before rewatering for the first few weeks. Roots grow to search for water. If the coco stays wet around them constantly, they won’t grow as fast. It is important to keep this in mind after you transplant weed clones into coco coir, you want to get the root structure to develop as quickly as possible.


")